
A Comprehensive Guide to Editing Bird Photos in Adobe Lightroom: Leveraging the Latest AI (Artificial Intelligence) Updates
- Tyron Dall

- Oct 3, 2020
- 9 min read
Updated: Jan 14, 2024
In this guide, I will provide a step-by-step process on how to easily edit your bird photos in Lightroom to achieve vastly improved results from the original RAW images.
I would like to appeal to photographers to only shoot in RAW mode if they are willing to edit their photos. I often hear people proudly stating that they only shoot in RAW mode, but when I ask them if they edit their photos, they respond with statements like, “I know how to use my camera settings so well that the photos don’t need any editing,” or “I only crop the image.” My response to that is, you are just wasting space on your SD card. If you don’t do any editing, then you are better off just shooting in JPEG mode as you will use less space, and you will benefit from the camera manufacturer’s algorithm applied to your images to make them more appealing.
Another point to always be conscious of when editing bird photos is to focus on how the editing affects the bird in the photo, and not the entire photo itself. The bird is the subject, and the exposure, sharpness, and colors, etc., need to be adjusted with the bird at the forefront.
I will guide you through the process using two examples. Please note that I am using Adobe Photoshop Lightroom Classic 13.1 Release.
Example 1: Bar-tailed Godwit

One can see in the image above that the photo is overexposed. However, when looking at the histogram, there is no clipping occurring, so all the details should be recoverable when it comes to editing.
Step 1: Apply Lens And Chromatic Aberration Corrections.
This is a simple process of clicking two checkboxes. It doesn’t make a significant difference, but in theory, a camera’s lens does not capture a photo exactly how the human eye sees it. Therefore, a preset specific to your lens is applied to make a slight adjustment when this option is selected.

Step 2: Cropping
This is the time to crop the image to the desired size and aspect ratio. I try to stick to well-known aspect ratios e.g., 3:2, 16:9, 1:1, or 4:5. For this image, I am going to select the wide-angle 3:2 ratio. Also, when cropping, one of the biggest mistakes I see people make is that they crop too much, and the bird looks like it doesn’t have any space to breathe. A good rule to use is “The Rule of Thirds,” which you can Google. But basically, don’t just place your subject in the middle of the picture as it looks amateurish.


Step 3: Setting The Blacks And Whites
Setting the Blacks and Whites gives your photo a greater tonal range. This can be done easily by holding down the shift key and double-clicking on the word Blacks and then Whites.

Step 4: Highlights And Shadows
By adjusting the highlights and shadows, you will bring in a lot of lost detail to your images. I find that highlights are usually a killer for detail and unless the photo is shot in deep shade, then you can take the highlights down all the way to -100. Similarly, with shadows, you can usually increase this value a lot, but I find that if you increase it too much, it might start looking a bit fake and increase the noise in the image. A safe value to use is usually +75, but drag the slider and see what looks good to you.

Step 5: Exposure
Now is the time to adjust the exposure, and in this case, it is going to make quite a big difference as this image is quite overexposed. In this case, I will take the exposure down by -0.88.

Step 6: White Balance And Tint
One of the biggest mistakes I see people make is not adjusting the white balance of their photos. Yes, your camera has an auto white balance function that we all use, but it often doesn’t get it totally correct. Lightroom can also automatically adjust the white balance for you, but I find it often overcompensates.

Step 7: Clarity, Texture, Dehaze And Contrast
Texture mainly deals with high-frequency areas of contrast, and by increasing the texture, you can bring out the details and sharpness of objects in the near focal range of the photo. I usually play around with values from 0 to 30, and mainly within the 7 to 25 range. For this image, I chose 23.
Clarity improves the sharpness in the mid-frequency ranges. Don’t use it too much for images where you want to preserve a good bokeh effect. I have used 23 in this case.
Dehaze is a fairly new addition, and I am quite wary of it. It is used to increase contrast in the low-frequency areas. When I use it, I tend to use it sparingly. In this image, I used a value of 5.
Contrast is similar to clarity but it works on the whole tonal range of an image, whereas clarity (which is sometimes called local contrast) only affects the mid-tones. In this image, I have used a value of 23.

Step 8: Vibrance And Saturation
RAW images need their colors enhanced, and now is the time to do it. Both vibrance and saturation are used to increase the color depth of the image, but they do it in slightly different ways. Vibrance is the least aggressive and recommended way to adjust the colors, as it largely leaves alone areas that are already saturated. I normally use a vibrance value of around 18 to 30 and have chosen 23 in this case. I left the saturation value at 0, but for some photos, you might want to increase this slightly to really make the more colorful areas pop even more, but only add a little when doing this.

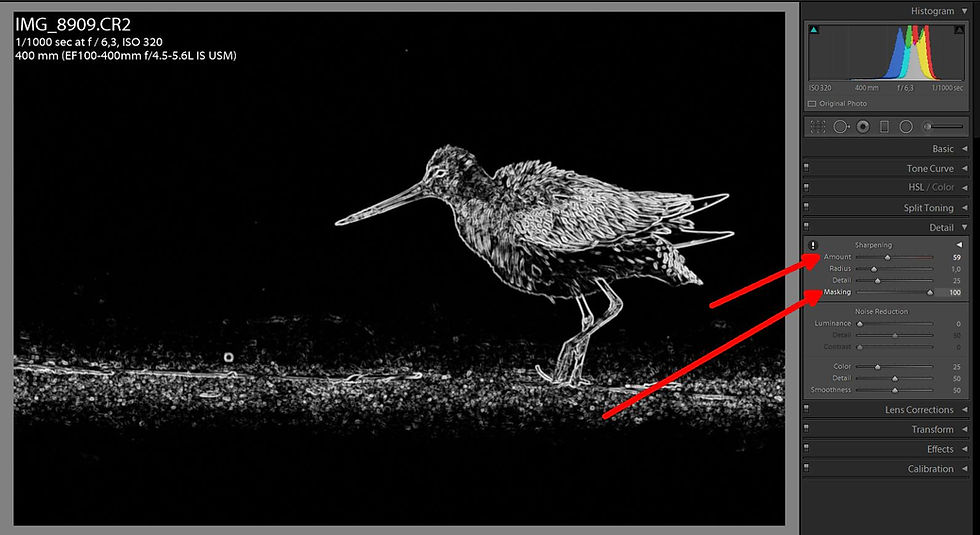
Step 9: Sharpening
At last, we can sharpen the image. For some reason, I find the strange value of 59 works out pretty good in most cases. Be careful not to over-sharpen as you will end up with harsh visible lines around edges of your objects often resulting in what is called a halo effect. The other important thing to do is adjust the sharpening mask. To do this, hold down the alt key and adjust the mask. When doing this, all the areas in white will be sharpened and the areas in black will not. This means that you will not be increasing the noise in the black areas and you will leave it more blurred, giving you a more desirable bokeh effect.
Step 10: Using Lightroom's AI-Powered Denoise Tool
Lightroom’s AI-Powered Denoise tool is a new feature that uses artificial intelligence to reduce noise and grain in your photos while simultaneously preserving details. This tool is particularly useful for photos taken in low light conditions or with high ISO settings.
To use the AI-Powered Denoise tool, navigate to the Detail panel in the Develop interface and click the Denoise button. Lightroom will then display the Enhance Preview dialog box with the Denoise option selected. You can use a slider to adjust the intensity of the AI-powered Denoise operation, or you can set a value manually.
Step 11: Marvel At Your Achievement
The most important and final step is to look at how well you have done. Pull up the before and after comparison and give yourself a pat on the back and a glass of wine.


Example 2: Blue-mantled Crested Flycatcher

One can see in this image that the overall feel is quite gloomy, as the bird was photographed in the shade. There is also a fair amount of noise that is visible. I feel that it is still worth editing this picture, as firstly this bird is not easy to photograph, as it is normally always in the thickets in deep forests, and secondly because I have not seen many other good photos of this bird, so it might end up being a good reference picture for this species.
For this photo, I am going to run through the steps a lot quicker as I have explained the methods behind them in the first example.
Step 1: Apply Lens And Chromatic Aberration Corrections.
Step 2: Cropping
I have chosen a 1:1 or square aspect ratio for the crop this time.


Step 3: Setting the Blacks and Whites
Hold down shift and double click the blacks and whites.

Step 4: Highlights and Shadows
In this picture I have taken the highlights down to -100, and even though I don’t usually increase the shadows to 100 (normally I use about 75), I find in this instance setting it all the way to 100 gives the best results.

Step 5: Exposure
I know the exposure will need increasing in this pic. Concentrate mainly on the bird itself, and not the background when adjusting the slider. I am happy with increasing the exposure in this case to +0.44.

Step 6: White Balance And Tint
I apply the Lightroom corrections and I notice it increases the white balance, but only very slightly. I generally find when the photo is in shade the white balance needs warming, and when its shot in sun, then it generally needs cooling. I am happy with the corrections in this case.

Step 7: Clarity, Texture, Dehaze And Contrast
Work with the ranges I have given in example 1 as a guide. In this case increasing the texture is bringing out detail in the feathers, but it is also accentuating the noise in the background so I am only increasing it to 14. clarity adjusted to 23, contrast to 18, and dehaze to 4.

Step 8: Vibrance And Saturation
I decided to increase the vibrance to 25, and added a touch more saturation with a slight increase to 2.

Step 9: Sharpening
I have gone back to my magic value of 59 for sharpening. You definitely want to apply a good mask to this as well, so as to only sharpen the bird, and leave all the nasty noise in the background alone. Mask set to 95.

Step 10: Using Lightroom’s AI-Powered Denoise Tool
Lightroom’s AI-Powered Denoise tool is a new feature that uses artificial intelligence to reduce noise and grain in your photos while simultaneously preserving details. This tool is particularly useful for photos taken in low light conditions or with high ISO settings.
To use the AI-Powered Denoise tool, navigate to the Detail panel in the Develop interface and click the Denoise button. Lightroom will then display the Enhance Preview dialog box with the Denoise option selected. You can use a slider to adjust the intensity of the AI-powered Denoise operation, or you can set a value manually.
Step 11: Marvel at your Achievement
In the end I think the photo has been improved immensely, and is actually one of the better pictures I have seen for this species.

Advanced Steps: Masking Out The Background Or Subject
One of the more advanced and optional steps in editing your bird photos involves using the AI-powered Masking tools in Lightroom. These tools allow you to make precise edits to specific areas in a photo. For instance, you can mask out the background or subject and only apply changes to sharpness, texture, exposure, and noise reduction to the subject of the photograph, not the background. This can significantly improve image quality.
To use the AI-powered Masking tools, navigate to the Masking panel in the Develop interface. Here, you can work on any portion of an image to make intricate and precise adjustments using masks like Brush, Background, People, and more. You can access manual masks as well as masks powered by artificial intelligence.
When you select a tool from the Masking panel, you’ll see a range of options to fine-tune your mask. For example, with the Brush tool, you can adjust the size, feather, and flow of the brush to create a mask that perfectly fits your subject. With the Background tool, Lightroom uses AI to automatically identify and select the background of your photo, saving you time and effort.
Once you’ve created your mask, you can apply edits such as adjusting the sharpness, texture, exposure, and noise reduction to only the masked area. This allows you to enhance the subject of your photo without affecting the background, leading to more professional and visually pleasing results.
Using The Experimental AI Lens Blur Tool
Another exciting feature in Adobe Lightroom is the experimental AI Lens Blur tool. This tool allows you to achieve more bokeh, resulting in a more pleasing image. Bokeh is the aesthetic quality of the blur produced in out-of-focus parts of an image.
The AI Lens Blur tool uses artificial intelligence to identify the subject of the photo and apply a blur effect to the background, enhancing the bokeh effect. This can help to draw attention to the subject of the photo and create a professional-looking depth of field effect.
To use the AI Lens Blur tool, navigate to the Effects panel in the Develop interface and select the Lens Blur option. You can then adjust the amount of blur, the feathering of the blur effect, and the shape of the bokeh highlights.
The amount of blur controls how much the background is blurred, while the feathering controls how gradually the blur effect transitions from the in-focus areas to the out-of-focus areas. The shape of the bokeh highlights can be adjusted to create different aesthetic effects, such as circular or hexagonal bokeh.
Remember, these are advanced steps and may require some practice to master. But with patience and experimentation, you can greatly enhance the quality of your bird photos using these powerful AI tools in Adobe Lightroom.


